



OTC Daihen Robot Teach Pendant Screen Drift and Failure Cause Analysis
In the daily operation of automated arc welding workstations, the handheld teach pendant (such as the teach pendant equipped with the W-L02140 core touch component) is a highly utilized human-machine interface. After continuous production for a period of time, operators often find that the screen click positions shift entirely (e.g., clicking Menu A triggers the adjacent Menu B by mistake). This phenomenon is common in industrial-grade resistive touch screens, usually caused by micro-drift in the physical layer spacing triggered by drastic temperature fluctuations in the workshop, RF interference generated by high-pulse arc discharge, or the accumulation of dense conductive metal spatter and oil stains in the gaps at the edge of the screen.
When the screen drifts but is still clickable, the full-digital five-point coordinate system re-fitting calibration can be performed through the system background of the teach pendant without replacing hardware directly. The following is a standard official teach pendant touch screen position correction and troubleshooting tutorial compiled by senior maintenance engineers:
Call Up the Touch Screen Control Window via Constant Setting
Power on the robot control cabinet, use the shortcut keys or directional keys on the main operation interface of the teach pendant to click into the background menu successively: [Constant Setting] → Select [7 T/P Key] → Further select [10 Touch Screen] control bar. In the pop-up configuration details, first ensure that the “Touch Screen Operation” parameter is in the [ON] active state. At this time, the functional soft key [F9] below will change from a gray unavailable state to a highlighted available state.
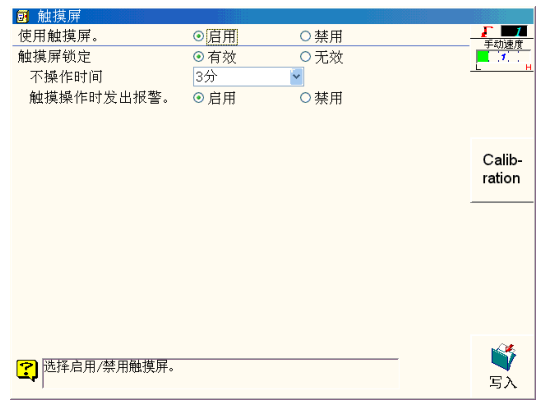
Force Close [Operation Preparation] and Press F9 to Start Calibration
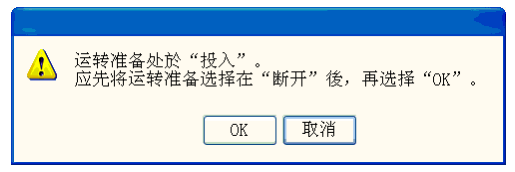
Due to the standard requirements for personal safety protection of fully automated equipment in industrial sites, before executing screen calibration, you must manually press the emergency stop button on the control cabinet panel to cut off and close the [Operation Preparation] signal chain. After confirming that the operation preparation is completely disconnected, press the [F9] key on the physical keyboard of the teach pendant to start the calibration. If the operation preparation signal is not disconnected, the system will pop up a red warning window as shown in the picture, restricting you from proceeding to the next step.
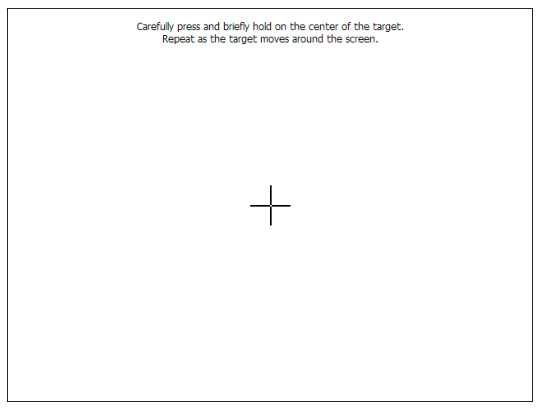
Accurately Click the Five-Point Crosshairs Around and in the Center of the Screen
After entering the calibration mode, the entire graphical interface of the teach pendant will fade out, the screen background will turn gray, and high-contrast circular crosshair flashing marks will sequentially appear in the top left, top right, bottom left, bottom right, and exact center. The operator needs to use a professional industrial insulated touch stylus (or fingertip) to click vertically and extremely accurately on the absolute geometric center of each crosshair. Each time a point is successfully clicked and aligned, the crosshair will automatically shift clockwise to the next quadrant position.
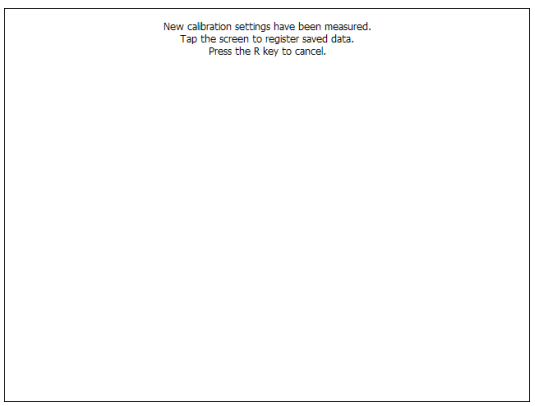
Check and Click Full Screen to Save and Register New Calibration Parameters
When the center calibration of all 5 geometric position points is completed smoothly and uninterruptedly, the interface will automatically cut into the final data registration window, and the screen will prompt “Please click anywhere to complete registration of new settings”. At this time, gently click anywhere in the blank space of the touch screen, and the underlying Linux control system will officially overwrite the old drifted coordinate constants with the newly generated resistive row-column scanning voltage mapping matrix, achieving data storage. If you feel that a certain point is not clicked accurately during calibration, you can press the [Reset/R] key on the left side of the physical keypad area at any time to force quit and abandon this save.
System Returns Without Error, New Calibration Officially Takes Effect
After clicking full-screen save to write, the system will automatically unlock the safety lock and return to the original [Constant Setting] basic form details page within seconds. At this point, the complete set of teach pendant resistive outer screen calibration is officially successfully concluded. You can release the emergency stop, turn on the operation preparation, and test whether the touch response accuracy of each quadrant of the screen has been fully restored as before.
⚠️ Core Troubleshooting Points for Teach Pendant Touch Screen Calibration on the Workshop Frontline:
- How to resolve the endless loop of the crosshair repeatedly returning to the center? During the blind continuous clicking of the crosshair in Step 3, if the operator’s hand trembles slightly, the click angle is too skewed, or tiny conductive metal wire dust gets stuck in the edge gaps of the resistive screen (causing the bottom layer to judge multiple false heavy touches), the system algorithm will judge that the calibration matrix distortion at that point is too large. At this time, the crosshair will instantly bounce back to the exact center of the screen, forcing a restart. When encountering this situation, do not press heavily on the outer screen. First, use an insulated plastic sheet to clean the dust and slag in the gaps around the screen bezel. Keep the outer screen dry and free of oil before using a fine-tipped touch stylus to press vertically and precisely.
- How to troubleshoot when data still drifts after multiple recalibrations? If the screen touch accuracy drifts on a large scale again after a cold start of the control cabinet or after the high-current welding arc starts in the workshop, it often means that the low-voltage DC output ripple coefficient of the switching power supply inside the teach pendant is too large, or the internal shielding layer of the highly flexible main shielding teach cable (such as
L21501B00) at the tail has suffered a hidden break during long-term anti-torsion operation with the machine body, causing high-frequency RF noise from the strong current inverter room to reversely cross-talk and break down the chip ceramic decoupling capacitor (100-1673) on the teach pendant motherboard. You should promptly check whether the control cabinet grounding resistance is less than the official standard of 10 ohms, and be prepared to replace the wiring harness quickly.
️ Get Core Screen Components and Official Professional Technical Support for Teach Pendants
If the outer screen of the teach pendant exhibits completely no physical response to clicks, large-area touch dead zones, or even if the above five-point calibration is executed frequently, the maximum deviation still cannot be eliminated, this usually indicates that the indium tin oxide (ITO) conductive layer inside the touch panel has physically deformed, hardened, or locally damaged. Welcome to contact us directly to obtain the official standard quotes and inventory of the latest original high-transparency anti-fingerprint touch panels (W-L02140), high-contrast backlight LCD inner screen components (100-1905 / 100-3632), original housing membrane keyboards for AX/FD series, and quick-change rotary parts for the whole machine:
How to Use Original High-End HMI Consumables to Ensure High Uptime of Automatic Arc Welding Workstations?
Fully automated digital arc welding production lines usually operate in harsh 24-hour non-stop environments. As the core physical channel for operators to access process parameters and calibrate the TCP tool center point of the welding torch, the integrity rate of the teach pendant directly correlates with the production stoppage losses of the entire line. We strongly recommend that equipment departments in each workshop achieve two points: First, strictly prohibit the blind replacement of low-end, non-shielded aftermarket touch outer screens without anti-wave characteristics in the workshop. Such inferior screens are highly susceptible to electrostatic breakdown at the moment of high-current arc ignition, causing the internal CPU board (L20060C00 / L23400C00) of the teach pendant to crash; Second, insist on applying high-transmittance industrial-grade tempered scratch-resistant protective films (L21510B01) on the front of each teach pendant, and strictly forbid operators from directly poking the screen with the tip of welding wires, sharp metal needle tips, or dirty gloves covered with highly conductive metal dust. We promise that all the original HMI touch outer screens, full-digital LCD backlight modules, safety three-stage enabling switches, self-locking emergency stop buttons, and highly flexible anti-bending main cables supplied are 100% brand new, genuine products from official channels. If you need to confirm today’s real-time stock of parts, obtain a full set of external safety circuit wiring manuals for the control cabinet terminal block, or Fronius special high-precision welding system spare parts information, please feel free to contact our technical service team at any time.