



While operating the OTC DAIHEN XD600G welding machine, if the equipment detects an abnormality, the abnormal indicator light (yellow) on the control panel, or LED1 (red) / LED2 (green) on circuit board PCB1 will light up or flash. Simultaneously, the welder will trigger a self-protection mechanism and automatically shut down. To help you quickly clear alarms and resume production, we have compiled the following troubleshooting and resolution methods for 12 common abnormal conditions.
I. XD600G Panel Indicators & Fault Quick Reference
Before conducting specific troubleshooting, you can refer to the panel indicator diagram and overview table below to preliminarily locate the direction of the fault:
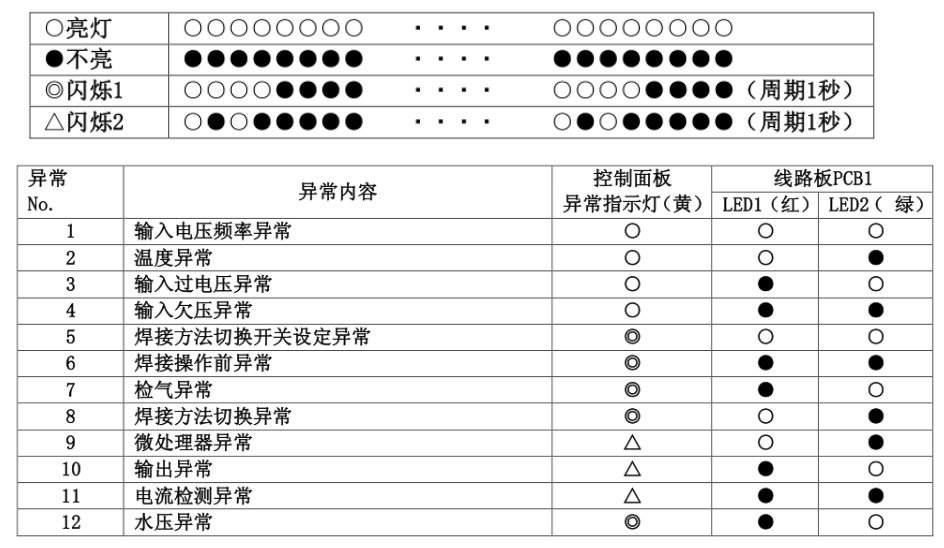
II. 12 Common Abnormal States: Causes and Clearance Methods
| No. | Abnormality Type | Fault Phenomenon & Trigger Cause | Resolution & Clearance Method |
|---|---|---|---|
| 1 | Input Voltage Frequency Abnormal | When the power control switch is “ON”, the input voltage frequency fluctuates, the abnormal indicator lights up, and the machine stops. | Turn off the power control switch. Wait for the input voltage frequency to stabilize, then re-energize to clear the abnormality. |
| 2 | Temperature Abnormal | Exceeds the rated duty cycle, or the ambient temperature exceeds 40°C. The abnormal indicator lights up and the machine stops. | Keep the power ON and wait for about 6 minutes. You can resume use after the indicator goes out. Please reduce the operating current to control the duty cycle. |
| 3 | Input Overvoltage Abnormal | When the input voltage exceeds 475V, the abnormal indicator lights up and the machine stops. | Turn off the power control switch and use a multimeter to measure the input voltage. After confirming and eliminating the excessive voltage, re-energize to clear. |
| 4 | Input Undervoltage Abnormal | When the input voltage falls below 285V, the abnormal indicator lights up and the machine stops. | Turn off the power control switch. Confirm there are no abnormalities in the power supply, then re-energize. |
| 5 | Welding Method Switch Setting Abnormal | In CO2/MAG mode, an unused ID number is set on the remote control pendant. The abnormal indicator flashes (Flashes 1 time) and the machine stops. | Restore the switch on the remote control pendant to its normal setting to clear the abnormality. |
| 6 | Pre-Welding Operation Abnormal | Holding the torch switch while powering on, or the torch is “ON” and the output side (electrode/wire and workpiece) are in contact while switching modes. The indicator flashes (Flashes 1 time). | Turn off the power control switch and separate the output side (release contact) to clear the abnormality. |
| 7 | Gas Check Abnormal | The gas check switch on the control panel has been in the “Check” state for more than 2 minutes. The abnormal indicator flashes (Flashes 1 time) and the machine stops. | Reset the gas check switch to “Weld” to clear the abnormality. |
| 8 | Welding Method Switching Abnormal | The welding method was accidentally switched during the welding process. The abnormal indicator flashes (Flashes 1 time), and welding is automatically terminated. | Restore the toggle switch to the state it was in before the abnormality occurred to clear it. |
| 9 | Microprocessor Abnormal | The built-in microprocessor has an internal fault. The abnormal indicator flashes (Flashes 2 times) and the machine automatically stops. | Please try restarting the equipment. If it cannot be cleared, contact an authorized agent for professional PCB inspection and repair. |
| 10 | Output Abnormal | After CO2/MAG mode welding is completed, there is still voltage output while the torch switch is “OFF”. The indicator flashes (Flashes 2 times). | Turn off the power switch. Use a multimeter to check if the AC contactor or main thyristor (SCR) has broken down. Re-energize after resolving. |
| 11 | Current Detection Abnormal | The wiring between the Hall sensor and the circuit board (PCB1) is disconnected or loose. The abnormal indicator flashes (Flashes 2 times). | Turn off the power switch, check and re-insert the relevant wiring firmly. Re-energize after resolving. |
| 12 | Water Pressure Abnormal | When using a water-cooled torch, if cooling water circulation is insufficient or missing, the welder will automatically stop (Alarm indication is the same as Gas Check Abnormal). | Check the water cooling tank. Top up the cooling water or restore the water flow to clear the abnormality. |
💡 OTC XD600G Smart LED Diagnostic Assistant
Machine suddenly stopped? Observe the behavior of the yellow [Abnormal Indicator Light] on the front panel and click the corresponding status below for immediate expert analysis:
Thyristor and PCB faults involve high voltage. Non-professional electricians must avoid working on live equipment! We provide official standard on-site maintenance and genuine OTC spare parts.
Emergency Tech Support Hotline: +86-180-9663-1656 (WhatsApp/WeChat)