



OTC Daihen Robot Absolute Encoder Zero Position Loss Causes and Reset Background
In automated arc welding workshops, OTC DAIHEN welding robots rely on high-precision absolute encoders at the tail of the motors to accurately record the absolute spatial geometric coordinates from axis 1 to axis 6. When the system memory and encoder backup batteries built into the control cabinet (such as standard spare parts L8292V00 or W-L02679 lithium batteries) are exhausted due to lack of shutdown maintenance for a long time, or when the encoder cable is forcibly unplugged and plugged in the shutdown state, the mechanical axis servo motor is replaced, or the RV reducer is disassembled for maintenance, the control system often triggers zero position loss or origin data damage alarms (such as common A5010, A5020 errors).
Once such an alarm occurs, the robot’s operation preparation cannot be turned on, and the system is forcibly locked. At this time, it is necessary to align all joints of the mechanical arm to standard physical scale marks, enter the special protection mode at the bottom of the system through the teach pendant (TP), and refresh and reset the absolute value pulse count. The following is the official standard compiled by equipment engineers: Specialist Encoder Reset Correction Practical Guide:
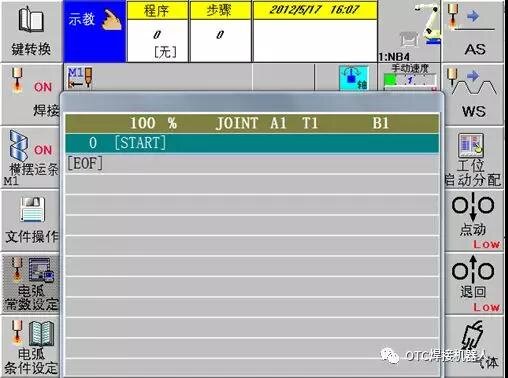
Enter the Teach Pendant System Main Boot Interface
Confirm that all physical joint axes of the robot are safely and accurately aligned with the mechanical zero scale marks. Power on and start the control cabinet, wait for the Linux kernel and control program to finish loading on the handheld teach pendant, and enter the standard main boot interface.
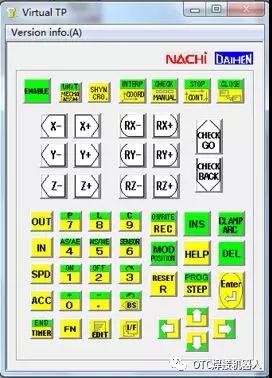
Press the [R] Reset Key on the Teach Pendant Physical Keyboard
In the physical key area below the teach pendant, find and press the [R] (Reset) key representing Reset to activate the command line quick command code input window at the bottom of the control cabinet.
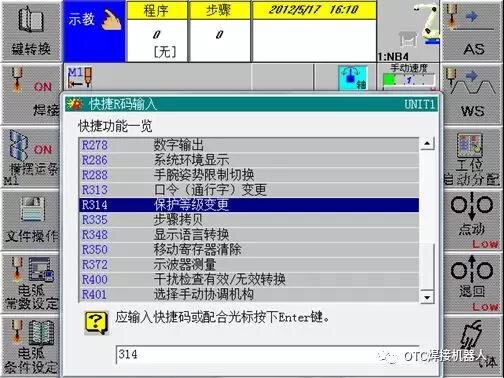
Enter the Specialist Permission Mode Command Code [314]
Use the numeric keypad to enter the system bottom exclusive interface code [314] into the input box. This code is used to awaken the advanced electrical debugging window for protection level change and permission switching.
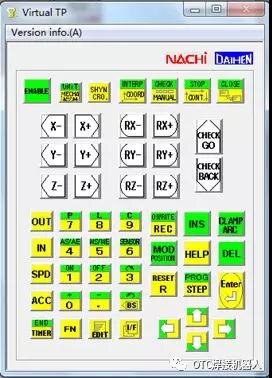
Press the [ENTER] Confirmation Key in the Lower Right Corner of the Physical Keyboard
After verifying that the entered number 314 is correct, press the [ENTER] (Confirm) key in the lower right corner of the teach pendant physical panel to confirm calling the protection level change menu.
Enter the Official Specific Specialist Safety Password [12345]
In the pop-up password verification prompt box, enter the standard specialist-level core safety maintenance password [12345]. After entering, press the [ENTER] key again for bottom-level authentication.
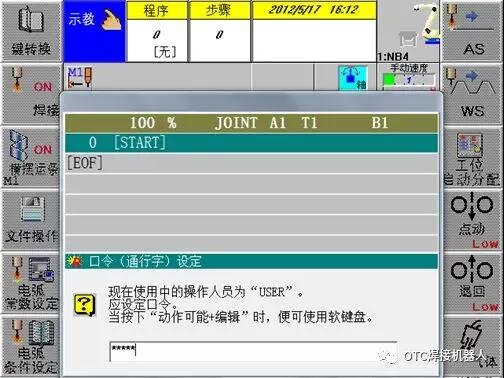
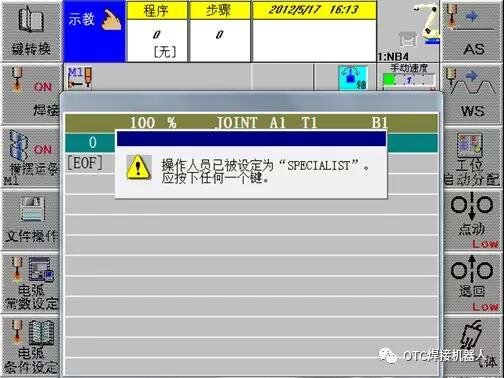
System Level Security Changed to [SPECIALIST] Status
The interface displays “Protection Level: SPECIALIST”, indicating that the system has successfully overridden the authority and switched to the unrestricted specialist maintenance mode. At this time, press any key to return to the original system main page.
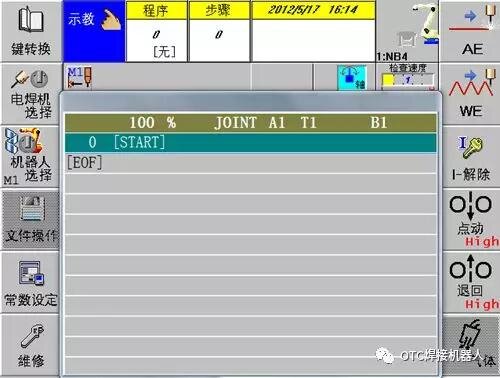
Shortcut Key Combination to Enter the System [Constant Setting] Interface
Hold the teach pendant safely with both hands. While pressing the rear enable switch (“Action Possible” key), press the front function key [F5] (Constant Setting) to call up the robot core variable console.
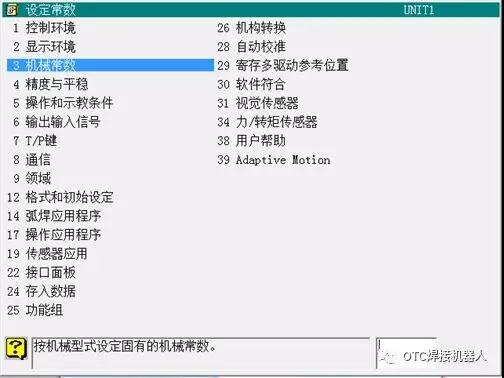
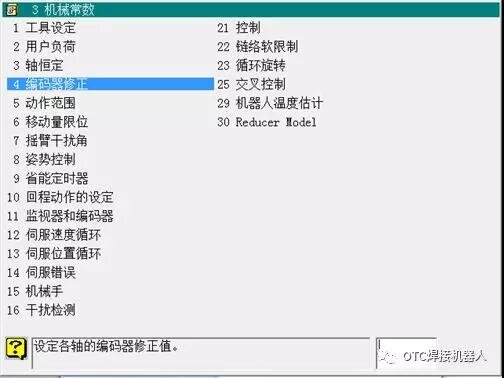
Move Cursor Down to Select Item 3 [Mechanical Constant]
Move the highlighted cursor down using the direction selection keys, accurately lock onto the entrance for item 3 [Mechanical Constant] variable, and press the [ENTER] key to enter the lower-level transmission parameter list.
Move Cursor Down to Select Item 4 [Encoder Correction]
Continue using the direction keys to move the cursor down, locate item 4 [Encoder Correction] (i.e., absolute zero count refresh control line), and press the [ENTER] confirmation key to enter the pulse window for each axis.
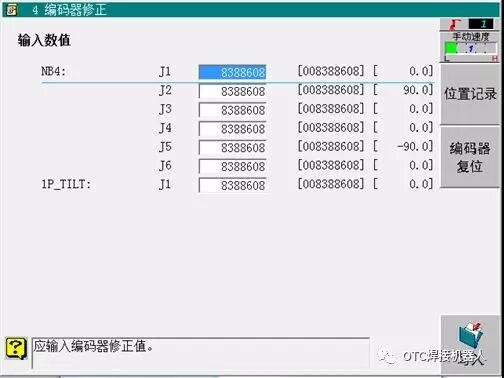
Press Soft Key [F9] to Awaken Encoder Reset Bottom Mechanism
After entering the encoder correction interface, press the function soft key [F9] (Encoder Reset) at the bottom of the screen. The interface will load and display the original pulse count values of the robot’s current joints (Note: Do not blindly input numbers directly here for modification).
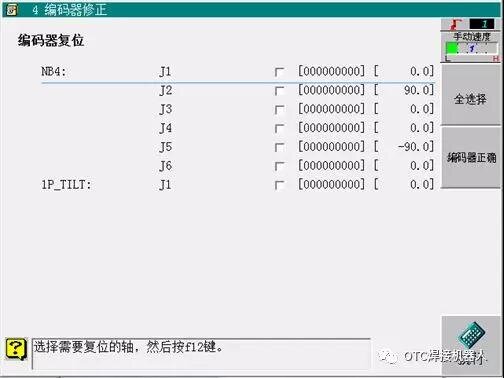
Press Soft Key [F7] to Select All Action Axes
To ensure the origin phase synchronization of the linked 6 axes or the system with external axes, press the function soft key [F7] (Select All) at the bottom. At this time, all corresponding checkboxes from axis 1 to axis 6 (and additional axes) will be blackened and checked.
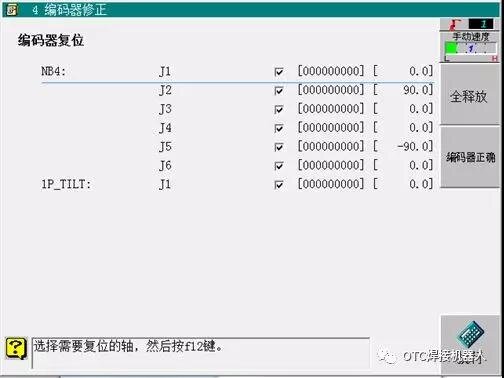
Confirm and Press [F12] to Officially Execute Refresh
Finally, press the function soft key [F12] (Execute). Confirm in the pop-up ultimate safety confirmation window. The system will formally erase the original encoder error memory, and refresh and record the current scale line aligned position as the brand new standard absolute zero position.
⚠️ Industrial Site Maintenance Core Precautions:
- Prevent System Lock Prompt: If the teach pendant pops up an error “Disconnect Operation Ready” during the reset execution process, immediately press the large mushroom emergency stop button on the robot control cabinet operation panel or the external linkage console to smoothly lift the lock and continue operation.
- Blind Input is Strictly Prohibited: The various pulse and correction values presented in the list and step diagrams are for demonstration reference only. Due to the uniqueness of the factory mechanical reduction ratio, motor speed, and physical calibration constants of each axis for every robot, do not directly copy the numbers in the diagram to input.
- Ultimate Cold Start Takes Effect: After step 12 execution is complete, the main air circuit breaker switch on the control cabinet must be completely disconnected (power completely turned off). Wait 15 seconds for the residual power in the control cabinet capacitors to discharge, and then cold start the robot control system again. At this time, the system error disappears, and the encoder origin reset is officially effective.
Quickly Obtain Robot Zero Positioning Consumables and Original Technical Support
Frequent loss of absolute encoder zero position is often caused by the workshop’s failure to perform standard regular maintenance, undervoltage of the control cabinet or motor encoder backup lithium battery, or crosstalk breakdown of the shielded body cable and internal control board due to electrical leakage. Welcome to contact us to obtain the latest official standard spare parts quotes, original regular maintenance lithium battery spot stock, and more in-depth advanced electrical troubleshooting drawings:
How to Completely Prevent Origin Loss Due to Power Failure in OTC DAIHEN Robots?
In an automated continuous assembly line, encoder data loss caused by battery undervoltage means that tedious TCP trajectory teaching calibration must be performed again, which will lead to extremely high production shutdown losses. To eliminate such faults in the bud, we recommend that the workshop maintenance team do two things: The first is never replace the origin lithium battery when the control cabinet is shut down and the power is cut off. The quick replacement of the old battery with an original factory brand new large-capacity long-life lithium battery (such as L8292V00, W-L02679) must be performed while the cabinet is normally powered on and the main control CPU is running normally. The second is to persist in performing mandatory preventive updates on the internal batteries of the control cabinet and six-axis joint motors during the annual factory holiday or equipment inspection cycle (usually 2,000 working hours). We promise that the full series of absolute encoder units, backup lithium battery packs, and highly compliant multi-shielded body cables we supply are 100% Brand New Official Original Imported Genuine Products. If you need to know the real-time quotes of spare parts, apply for on-site teach torch origin recovery, or consult data on Fronius / Binzel special automated arc welding accessories, please feel free to consult our technical service team at any time.